Saturday, March 14, 2009

D-Day: The Experiment Begins

Today at 7:00 pm I threw these PVCs loaded with potential substrate into the catchment pond. The aluminum, fiberglass, and rubber squares are attached with picture wire. The vinyl and weed guard mat (which I attached at the last minute purely because it was sitting in my garage) are attached with duct tape since the wire cut too easily through those materials. The PVC pipes are held to the bank by fishing line and stakes.


Friday, March 13, 2009

Hardware Store

Club members ecrussel and e.allen paid a visit to Lowe's this evening, scouting any possible materials that could be used in place of aquamats in the designs below.
The initial plan is to attach all of these potential substrates to PVC with duct tape and submerge in a nasty pond to get a feel for the timeline, what works, and what doesn't. Daily (twice daily?) checks will be performed and I will record visible changes.
The material was chosen based on information from Lowe's personnel Jenny and Tim (we briefed them on our project and threw around material names).
We have:
91x213 cm fiberglass screening
91x213 cm aluminum screening
Dur-a-bull Indoor-outdoor mat 91x122 cm
Style selections premium vinyl shower curtain liner 183x183 cm
Rubber mat approx 15x15 cm
2 2.54cm x 1.52400m PVC and 4 caps to fit on the ends.
We will cut all materials into .5x.5m squares except for the small rubber mat, which was the only material of its kind available at Lowe's.
The screens will go into the water tomorrow at 6:00 pm, and will be checked at 6 am every day.
This is only the rough start of a series of experiments, and we will get more precise measurements in the future. Please comment with any modifications you would like to offer on this experiment, or any ideas for future experiments, or any other type of feedback.
Thanks for frequently checking into the blog!
-ecrussel and e.allen

More news from Belize

First of all, I should mention that I will be meeting with the Independence High School Environmental Club on Wednesday next week. They have over 50 members and are extremely active.

I have also had a chance to tour some of the area farms and check out our progress. In addition to the work with Aqua Mats, other mitigations are also ongoing in the effluent canals.

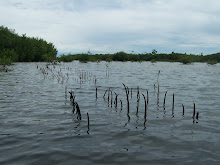
One of those projects is mangrove planting. Mangroves are a kind of tree that grow in salt water. They remove nutrient directly from effluent water and support colonies of organisms that also absorb nutrients. Recently I had a chance to check on some of those we've been doing for the World Wildlife Fund (WWF).

Here's a picture at Aqua Mar shrimp farm showing Mauricio Mejia of WWF checking out some plantings we did with John Cheeseman of the University of Illinois. Survival is still over 95% at this site. We're happy with the progress here.


We also checked some plantings from Royal Maya. Some of these plantings were done in August of 2008. Some were done in November 2008. This picture shows Mauricio Mejia and Adrian Vernon (a community researcher in Placencia) checking out the November planting. The survival was very good there as well.


And the plantings from August at Royal Maya are growing to impressive sizes, with 4 internodes already in place and side-branching beginning. When these trees are fully grown, they will be an important part of the mitigation process in the farm effluent.


Tuesday, March 10, 2009

Placencia Lagoon Fisheries


I am in Belize now, and have had a chance to do some field work.
Specifically, I was able to help Eli Romero, a Belizean about to begin graduate school at Boston University. His study examines the movements of fish from the lagoon to sites offshore. This project is similar to one I did in the past, so we have been communicating and collaborating. In the picture above, we are surveying the catch of a local fisherman. Eli bought fish from this fisherman to sample the fish tissues for chemical tracers unique to the lagoon. Habitats like the lagoon are nursery areas for important commercial species like snapper.


By improving shrimp farm effluent quality, we are helping protect this fishery and the livelihood of fishers like this. We are also helping protect biodiversity. Unique fish like the trunk fish juvenile and adult below are common in the lagoon. By preserving seagrass habitat, we help protect their ability to survive.


Friday, March 6, 2009

Club Discussion - Friday, March 6, 2009

Today, in Inventor's Club, our sponsor, Mr. Bergandine, suggested that not only will we be encountering issues with our current design of the substrate, but that we also need to design a tool to use to remove the biomass from the substrate. The question is how we are going to scrape both sides of the netting/mesh that we currently have hanging down from the PVC pipes. We should try to make this a very automatic process. We would like to only have to go in one direction when harvesting. At the moment, our idea of scraping the biomass off into the boat with a scraper of some sort attached to the boat can only remove the biomass from one side at a time, requiring a second run through. Ideally, we would like to find a solution that requires little hands-on work.

In order to address the issue, we have split up into two groups, one focusing on the substrate design while the other would begin working on the harvesting tool design. Everybody should make sure they communicate with the other group members, preferably on the blog, in order to ensure that both groups are working in the same direction.

We also discussed possible testing plans. We have fish tanks available, but placing the testing materials in ponds would be preferable for two reasons:
  1. In the fish tanks, a lot of the algae would probably grow on the glass instead of the substrate.
  2. Ponds would create a better simulation of the natural enviroment and the light exposure.

E. Russell and E. Fritzsche mentioned easy access to ponds. We would probably want to begin testing soon. Mr. Smith mentioned that this time of year may be the best time to test due to the lack of tree leaves that would block out the sun, ensuring similar growing conditions as those in Belize. Also, there is little movement in the water and not too much rainfall. Our goal is to have some test results by the end of spring break.

InvenTeams is also an option. Applications submitted by March 20th will be given early feedback. The initial application deadline is April 24th. If we are to do this, we will have to work very quickly. More information is available at their website.

Friday, February 27, 2009

An Alternative Design

In the club meeting this week we discussed Liz’s proposed design.
http://i710.photobucket.com/albums/ww101/theodore1800/design1v1.jpg

It has many positive qualities and works as an excellent starting point (thanks, Liz!)
Main Structure.
Working from this design, I created a similar structure. This design consists of a less sturdy structure, as I use the PVC piping primarily to keep the aquamats from moving and to allow for easy removal of aquamats for replacement. According to http://www.nurturetech.net/aqua.htm, aquamats are equipped with ballast bags to keep them in place, but the PVC structure could allow several aquamats to be removed from the pond at the same time. This structure, consisting of a primary pipe paralleling the side of the effluent canal and perpendicular secondary pipes that the aquamats slip over, is attached to bank of the canal by ropes. One end of a rope would be tied to the primary pipe, and the other end would be tied on a stake on the side of the canal. This means the entire structure can be removed.
Details.
Each unit stemming from the primary pipe is connected by a tee and consists of one PVC pipe, one aquamat, and one cap. The PVC pipe length is slightly longer than the top of the aquamat. For the present, my idea for attaching the aquamat to the pipe would be to fold the top over to create a tunnel. I still need to work out exactly how this could be done, one option would be to sew this pocket in the aquamat; another option would be to use some kind of adhesive or pin to secure this tunnel. The aquamat would be kept from sliding off the PVC pipe by the cap. The top of each unit will be roughly equal to the surface of the water because of the floatation element associated with the aquamat.
Removal of substrate.
This design offers several different options for removal of organisms. I will briefly outline a few of them (discussed in our latest inventor’s club), and eventually follow up with more details.
1. Remove the entire structure and place in shrimp pond. Pros: this way we can utilize organisms growing both on the aquamats and the primary pipe. Cons: time must be allowed for the shrimp to eat off the structure
2. Remove entire structure and strip organisms by hose or rake. Pros: allows for faster cycle than in option 1. Cons: labor
3. Remove aquamats only and strip organisms by hose or rake.
4. (Inspired by Mr. Smith) Leave entire structure in the water, and move down the middle of the canal scraping all of the aquamats in sort of one swoop (this would only work with careful spacing of the aquamats, and we would have to develop a way to collect the substrates in the water). Pros: quick and dirty, Cons: we need to look into this further to be more specific. Hard to describe, so included a brief video demo- the spatula with basket represents the scraper tool (more on that later), the sticky notes are aquamats.


Pictures

Apologies for the strange model. PVC pipes represented by chopsticks, caps by pencil toppers, aquamats by cut paper, water by blue towel, rope by red yarn, PVC tees by masking tape.

http://i710.photobucket.com/albums/ww101/theodore1800/design1v2.jpg



http://i710.photobucket.com/albums/ww101/theodore1800/Overview.jpg

Credits: Thanks to CorelDRAW and Paint for graphics, http://www.irrigationtutorials.com/instal05.htm for hardware knowledge, http://www.nurturetech.net/aqua.htm for aquamat information, Mr. Smith for inspiration and wisdom, Liz for original design

Friday, February 20, 2009

Possible Starting Point for a Design

Post by Allen

After Tuesday's meeting, I thought of a simple design that might serve as a good starting point. I built frame for meshing to collect nitrate with PVC piping and it cost $6 total, although I had some left over. The box is 2 ft. x 2 ft. and the part that sticks out is 15 in.
It was very easy to assemble, I was able to cut the pieces and put it together without help, and it took about 45 minutes.


Image link: http://i289.photobucket.com/albums/ll219/amariah118/Inventors%20Club%20Competition/IMG_7359.jpg


This is an overview picture - I tried labeling each piece of PVC and also the joints, I hope you all can see it. Everything is 1/2 in. pipes, except "top" and "bottom", which are 3/4 in. and meant to slide over the 1/2 in pipes that they are placed above and below of, #5 and #6. "Top" and "bottom" will have mesh between them, so when you slide it over #5 and #6, it will be held out in the water. Joint "E" is where the whole thing will be hung, so you can easily have as many as you want of these in a row. To remove the "top" and "bottom" bar: when it is hanging in the water, you press on #1, so the whole thing will rotate, and the mesh will come out of the water, when you can remove it and take off the things on it.

Here is a picture of it when it is put together:

http://i289.photobucket.com/albums/ll219/amariah118/Inventors%20Club%20Competition/IMG_7365.jpg


And here is a picture of how the 3/4 in. pipes will slide over the 1/2 in. pipes

http://i289.photobucket.com/albums/ll219/amariah118/Inventors%20Club%20Competition/IMG_7364.jpg


I hope that made sense, and if you have questions, I am happy to answer. There are some improvements that I can already think of.